Introduction
Most ZK use cases require a server-side event listener. This said, sometime a client-side listener can be more relevant.
In this article, we are going to explain the difference between a server-side and a client-side event listener. We will also see when a client-side listener is a good choice for a workflow.
Server-side listener
The simplest scenario for a ZK event follows this pattern:
– The User performs action in a browser
– The action triggers a client Event
– The client event is sent to the server through a request
– The server triggers the Java event listener associated with the component
One of the simplest possible case for this workflow is:
<button onClick=’System.out.println(“button was clicked”)’ label=”click me”/>
The full workflow looks like this:
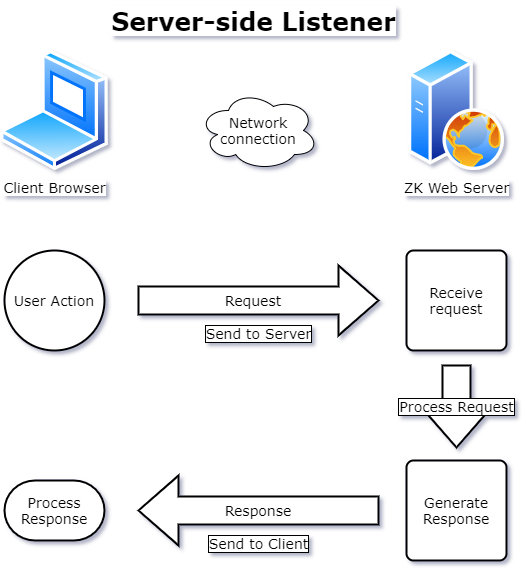
This is perfectly good for usages where the server needs to know that a specific event took place in the browser and provide an update.
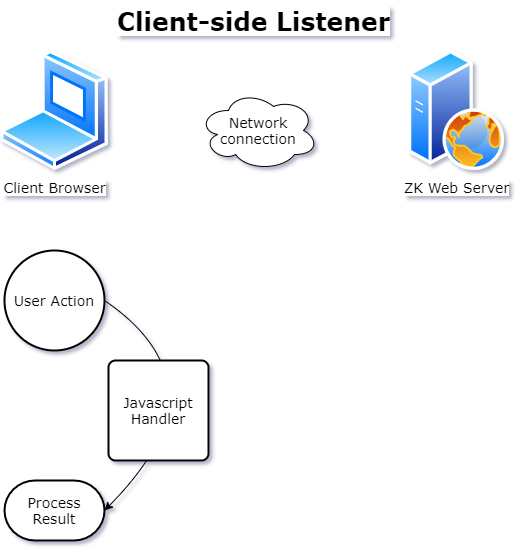
Client-side Listener
There are a few specific cases in which a client listener is more suited, however. If the use case fulfills the conditions:
– The server doesn’t need to know about the event
– The event is fired very often, such as scroll or key down
– The user shouldn’t wait for a full request-response cycle for the event to be processed
A client listener doesn’t send a request to the server. Instead, a JavaScript snippet is used to handle it directly at client-side.
Comparison:
Server-side listener
- Server is aware of the event
- Execute in JAVA at server-side
Client-side listener
- Efficient for quick-fire events such as scrolling or key presses
- Server is not aware of the event, unless specifically declared
- Execute in JavaScript at client-side
Code examples
Creating the custom widget. (source in Github)
function doCustomKeyDownEnter_(event, wgt, next) {
  if(event.keyCode == 13){
    //ENTER key == keyCode 13
    next.focus();
  }else{
    //do default
    wgt.$supers('doKeyDown_', arguments);
  }
}
Assigning the custom widget and the _next value to a component. (Source in Github)
<textbox id="tb4" w:use="zul.inp.CustomEnterTextbox" w:_next="'$tb5'" />
Practical case: Bank account form
Let’s say we have the following requirement list for a bank account form:
- Users fill in 3 textboxes.
- When the first textbox is full, the focus automatically jumps to the next textbox.
- When a textbox is empty, and the user hits backspace, the focus jumps back to the previous textbox.
- Tab, shift-tab and enter can be used for navigating these textboxes.
- The server doesn’t need to know incomplete form data
- The server doesn’t need to send an update until form completion.
With all of the these, instead of using a classic server-side listener, we can use a client handler instead. By using client-side event handling, we can intercept these user actions, and perform client-side actions in response.
The first step is to write a JavaScript custom widget to perform this handling: (source in Github)
zul.inp.CustomBankEntryFormTextbox = zk.$extends(zul.inp.Textbox, {
  doKeyDown_: function (event) {
    if (this._next != null && (event.domEvent.key == "Enter" || (event.domEvent.key == "Tab" && !event.shiftKey))) {
      zk.$(this._next).focus();
      event.stop();
      return;
    }
    // shift+tab keys
    if (this._previous != null && event.domEvent.key == "Tab" && event.domEvent.shiftKey) {
      zk.$(this._previous).focus();
      event.stop();
      return;
    }
    ...
We use the event.keyCode value to test which keys were pressed by the user. In this case, the interesting ones will be Enter, Tab, Shift and Backspace.
Based on the combination, we will perform one of many possible actions, such as setting the focus to the next or the previous component.
The next step is to declare this custom widget on each relevant component.
<vlayout>
  <label value="Routing number"/>
  <textbox id="tb7" maxlength="9" placeholder="Routing number" w:_next="'$tb8'"
  w:use='zul.inp.CustomBankEntryFormTextbox' />
</vlayout>
In this case, we use the client namespace to set our CustomBankEntryFormTextbox widget class as the widget class for this textbox. When the textbox triggers doKeyDown_, it will be performed by our custom doKeyDown_ method inside of this widget class.
We can also use the w (client) namespace to define custom attributes on the widget itself. In this case, w:_next="'$tb8'"lets use define the value of this._next, which is used in the custom widget.
We also need to call this.$supers('doKeyDown_', arguments);as the default case at the end of our handler, in order to perform the normal doKeyDown_ method.
Note that this is not limited to pure zul. Client handlers can be used and defined in Java code, from a composer for example.
The Result

I hope you find this article useful. You can find the full runnable sample project on Github.